Audio Playback Powered by Amazon Web Services |
Disclosure: Some of the links on this post are affiliate links, which means I may receive a small commission if you click a link and purchase something I have recommended. While clicking these links won't cost you any extra money, they will help me keep this site up and running and keep it ad-free! Please check out my disclosure policy for more details. Thank you for your support!
If you're alive right now with access to the Internet, chances are you've seen this latest productivity craze known as a “bullet journal.” Bullet journals are, for the most part, freaking amazing tools that would have saved me a lot of time and frustration thirty a few years ago.
I myself have been using the paper-and-pen form of a bullet journal since 2015, and it has completely changed my life. Okay, maybe not my life — but it's certainly changed the way I organize it.
And, yes, I do believe that pen-and-paper methods of tracking and planning still have a place even today with so many people tied to their digital technology. However, I cannot deny the convenience of having a digital bullet journal. So, I am going to show you how you can create a digital bullet journal using a free service called Evernote.
What is a Bullet Journal?
A bullet journal is a completely customizable system of organization to track and plan anything you want.
Literally anything.
I have always been a lists and planners person. To-do lists, task lists, goals lists… you name it and chances are I had it on a list somewhere. But, my problem was most of the planners out there, well, sucked.
They always either had sections I didn't need at all (mileage trackers, inventory trackers), or their daily agendas were completely restrictive (who only lives from 8am to 8pm?).
At one point in time I bought three different planners, ripped out the sections that I needed from each, and stuck them together in a binder. And while I used that binder and it suited my needs, what a waste of money (not to mention how bulky it was).
So when I discovered the bullet journal system, it didn't take long (one 4 minute video) for me to hop on that bandwagon.
First, I am in complete control (and what control freak wouldn't love that?).
I choose exactly what I want to track, exactly what I want to include, and what I want to exclude. Ideas, motivation, word count tracker, plot development worksheets, habit trackers, plus to-do lists and events schedules. And the best part is if I can't get to something to scratch it off my list — I just reschedule it.
Completely forgiving, no pressure, and no need to feel like I've failed just because I couldn't do it all.

Why use a Digital Bullet Journal?
So, if pen-and-paper bullet journals are so wonderful, then why bother to create a digital bullet journal?
To be honest, it didn't dawn on me that I would even use a digital bullet journal at first. And then I forgot to bring my journal with me several times within just a few weeks.
That's when I realized — I love my pen-and-paper bullet journal, but I'm much less likely to forget my phone than I am to forget my journal. Especially during those times I'm running out the door trying to make sure my toddler has everything she needs.
And by the time I'd get home, I found I was still scraping bits of scrap paper from my pockets looking for blog post ideas, events, and obligations that I had scribbled down and needed to transfer to my bullet journal.
And, inevitably, several ideas were lost.
Having a digital bullet journal has changed all that. I still keep my pen-and-paper bullet journal, but adding the digital aspect has helped me keep more organized when I'm away from my journal. And although I still use both, I know plenty of people who would lean heavily on a digital bullet journal (so much so that they would likely stop bothering with a pen-and-paper version all together).
Is there a Downside to a Digital Bullet Journal?
One of the major draws of a Bullet Journal is in the colorful and creative ways you can add in headlines.
Some people go all out, buying fun pens and learning how to draw them in and filling their journals with doodles. And it is a lot of fun.
But when you create a digital bullet journal, it's a little harder to get those fun banners in place. And there's really no place to doodle. If you're a journal minimalist (like me), then it probably won't bother you all that much.
I like my lists and my simple headlines with some washi tape along the edges to separate the sections and that's about it. But for those of you who put a lot more thought and planning into your headings and doodles, the digital bullet journal may not work out quite as well.
But it's not like you have to forego all colorful creativity when you create a bullet journal. I'll show you in this tutorial how you can create basic banners to use in your digital bullet journal. From there, you can get as creative as you like.
How to Create a Digital Bullet Journal
To create a digital bullet journal, you're going to need a few things:
- A basic idea of what you want to use the digital bullet journal for.
- A free account over at Evernote.
- The desktop client for Evernote (some of these steps can only be done in the desktop client — not on the web interface).
- A free account over at Visme (if you want to use banners in your journal).
Step One: set up two new Notebooks in Evernote.
Log into your Evernote account and create a new notebook. You can name it whatever you like, but for simplicity's sake for this tutorial, I have named this one “Bullet Journal.”
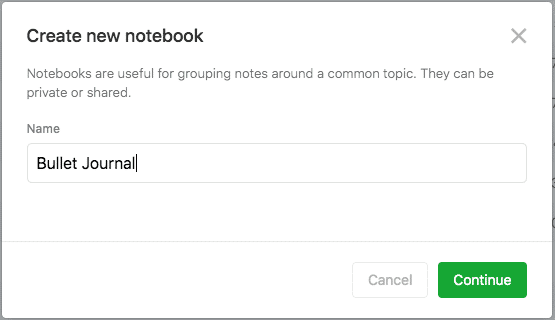
As the name implies, this is the notebook you are going to use to house your active Digital Bullet Journal.
Next, create your second notebook to house your templates. So name that something appropriate, such as “Templates Library.”
If you don't feel like creating things like calendars and the like on your own, you can go out and search the Internet — there are all sorts of calendars and to-do list templates available for you to download.
For us, we are going to use the Templates Library to create a template for the Monthly Log (you'll see why in a minute); everything else we are going to create directly in the Bullet Journal notebook.
Step Two: Create your Future Log
The first thing most people include in their bullet journals is an index or a table of contents of sorts — but we're going to skip that for now. The first thing we want to include is our Future Log. So, add a new note:

For the Future Log, all you really need is to list the month's names. Use as many as you like.
You can also insert divider lines to separate the months if you like. This isn't really necessary, but it helps give a little bit of separation and keeping everything nice and clean.
To Use: This is going to be where you log future plans. Things like conventions, book releases, NaNoWriMo.
You can also list your major goals and deadlines. At the end of the month, anything you have not marked as “completed” you can decide whether or not to move it to the next month. Then, delete the entire month (so your next month is at the top of your log) and keep going.
Step Three: Create your Monthly Log Template
After the Future Log, most people like to include a Monthly Log, which gives us a closer view of our month and weeks.
However, we don't want to have to create hundreds of these. So rather than simply creating a new notebook, we want to head over to the second notebook I told you to create, the Templates Library, and create a new notebook in there.
And, I also want to use a nice banner at the top of these notes…so let's do that.
Next, head over to Visme and create a new design:

You can choose from several different templates and sizes, or put in your own:

In the main menu on the left, click on “Graphics” and then select “Banners”:

And select the type of banner you want to make. You can choose between several types, including traditional banners:

Once you choose your banner, click on it to have Visme place it directly in the center of your design:

If you want to make the banner longer, click and hold the mouse at the end of the banner and pull it outward:

Next, you're going to want to add in the month's name. To do this, click on “Basics” and the first option available to you will be “Header & Text”:

The free version of Visme has a huge list of fonts you can use for free. But what I really love about Visme is that if you happen to be on the paid plan, you can upload your own fonts and expand your possibilities even more.
And for branding purposes, that's amazing.
But for now, just choose a font you like:

At the top left, you'll see the options for editing your text, including changing the font, the size, the alignment, and the color:

And over in the top right, you'll see another menu where you can add text effects or even animations (for images that will be embedded online). This makes adding a drop shadow to your text really easy:

Go ahead and experiment with different fonts, colors, and text effects until you have a completed banner you like:

Once you're happy with it, you can download the completed banner to your computer using the button over in the top right:

On the next screen, you'll be able to choose the best option for downloading your image. (note, with the free version of Visme, you're limited to downloading your project as a jpg):

Be sure to name and save your banners in a spot where you'll be able to find them later:

You can also use this method to create any other banners you might possibly want to use in your bullet journal. Create them for every tracker you plan to add into your digital bullet journal.
Once you're done, you can leave Visme and head back over to Evernote.
Go back to your Templates Library and find the note you created to be your Monthly Log Template. To upload your banners, find them on your computer, and then drag and drop them into the note:

Once all twelve banners have been uploaded, you can fill in the rest of the information for your Monthly Log. Primarily, you will want to list the days (starting with “1”):

And, if you like, you can also add dividers between the days to give more separation (this is mostly useful if you tend to have more than a few things to schedule on most days):

And that's it — your Monthly Log Template is done.
To Use: At the beginning of the month, use the desktop client (either Windows or Mac, this will not work on the web interface) and go into your templates library, then right-click on the Monthly Logs Template and select “Copy to Notebook”:
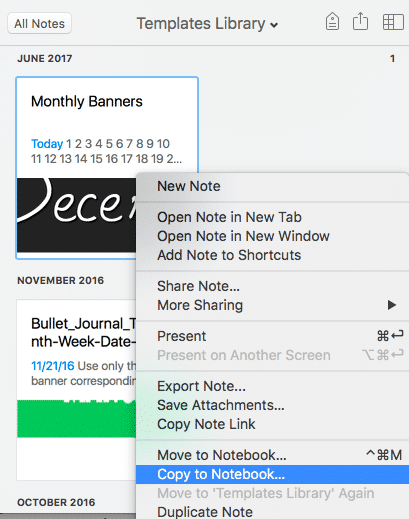
When prompted, select your Bullet Journal notebook:

Delete the banners for the months you don't need and you'll be good to go.
You can have more than one monthly log in your bullet journal notebook — just be sure to change the title accordingly (July Log, August Log, September Log, etc). And you can add in the days of the week as you need to.
What I like about this method is that it makes the template so reusable. Instead of having to create all new notes every time you need a new monthly log, simply copy your template and delete the unnecessary banners and you're done.
Use your monthly log for your mid-sized goals (for example, if your Future Log includes an ultimate goal of releasing your new book in December, then your monthly logs will include the smaller goals to help get you there, such as editing, proofreading, contacting reviewers, cover art, etc.).
Step Four: Create your Daily Log
The daily log is super easy to create: just be sure that the dates in the title match up to the days of the week. And once again, you can use dividers to help give your days some separation:

To Use: As you might have guessed, the daily log is to help track and organize your daily agenda or to-do lists.
Step Five: Create the Fun Stuff
Of course, if bullet journals were all about daily, monthly, and future logs, then there'd really be no point in them, right? You can find agendas and planners for that.
What really makes the bullet journal special is all the little extras that you can create and include.
So let's go ahead and create a couple of those little extras that you might think about including in our bullet journal (this is not going to be an all-inclusive list, obviously; but it should give you some ideas. By all means, feel free to use these as a starting point for your own special extras).
A list for Blog Post Ideas:
This one is pretty straight forward… Create a new note inside your Bullet Journal notebook and title it “Blog Post Ideas” — then simply keep a list. Every time you have an idea for a new blog post, add to your list:

You can even stick with the traditional Bullet Journal bullet points legend, if you like:
• = To-do
X = Completed
< = Scheduled
> = Moved
* = Important
O = Event
– = Note
Or you can create your own legend, something unique to you (and yes, you can even keep your legend as a separate note inside your notebook so you have it for easy reference).

A Blog Stat/Growth Tracker
There's one thing that is absolutely certain when it comes to writing and blogging: you absolutely must track everything if you're going to be able to see any progress. Especially if you're still relatively new.
From a branding perspective, blogging and establishing your presence on social media is imperative. But from a marketing and budgeting perspective, being able to prove any return on your time and effort can be nearly impossible unless you've got a good tracker.
For this, create your note and insert a table. Down the first column, type in the names of the month (you can also do weeks if you want to track your progress weekly instead of monthly). Then, along the top, plug in the metrics you want to track every month:

A Social Media Content Planner
Here, I created one to use for Facebook — but really, you can create a new log for every social media channel you're on. (And in the case of Facebook, you can even have one per page and per group).
Create your note, then insert a table. Down the first column, type in the days of the week; and along the top type in your primary categories (remember, you want to plan out your content so you are interacting with your readers more than selling to them, so keep a good mix of post types to help you do that).
You can also create a more traditional calendar spread, if you like, and add in the posts that way. Either way will work. I prefer this way because it gives me a more in-depth look at the type of content I'm posting.

Create a Blogging Goals Tracker
Having a place to record our goals and what they mean to us is vital for our own motivation to work to achieving them — so why not add in such a place to your new digital bullet journal?
Start by creating a new note. Then insert a table. Along the top will be your headings:
- Goal
- Action Plan
- Purpose
Then add new rows and fill them in as you need to.
Don't forget to check off the steps in your action plan every time you get another step closer to reaching your goal. Doing so will help keep you motivated and ready to work some more.

Create a Habit Tracker
One of the major draws toward a Bullet Journal is the ability to create and maintain a “Habit Tracker.” Any habit you are trying to build into a routine (or cut out of your routine) can be logged easily every month.
For this, you are going to need to use the desktop client for either Windows or Mac because of the size of the table you'll need to create (you can create a table using the website, but you will be restricted to only 6 x 6; and for this you want 16 columns times up-to-you-many rows.
So, go into your desktop client and in your Templates Library notebook create a new note titled “Habit Tracker.” Click on the icon for inserting a table and select “Table Properties.”
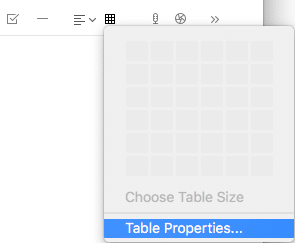
Then choose the number of columns and rows you want. You'll need 16 columns (one for the list, and the others for days 1-15 of the month). The number of rows is up to you depending on how many habits you want to track. You can always delete unnecessary rows later, so start high:

Along the top, skip the first column, and then type in the days of the month. In the first column, start listing the habits that you want to track:

Highlight the entire table and change the alignment to “Center”:

For tracking, we are going to add in checkboxes throughout the table. Simply click in the center of each square on the grid, and add your checkbox:

When you're done, copy the entire table and paste it just below, so you'll have two tables in the same note.

Change the dates in the second table, and you may need to add in another column for those months with 31 days. And that's it, you're done.
To Use: Simply check off the days you successfully completed the habit you're trying to build or break. At the end of the month, go back into your templates library and copy a fresh copy of the habit tracker over to your bullet journal notebook, adjust the dates along the top and change around the habits (adding new ones or deleting old ones as necessary), and start tracking again:

As you may have guessed, you can create a note for just about anything you want to include in your new digital bullet journal. So go nuts hunting down ideas on Pinterest (that's where I find most of my bullet journal ideas) and for any spread you find, you can create a note and add it into your digital bullet journal with just a little tweaking.
Step Six: Create your Index Note
Now, remember earlier I said we were going to skip the Index for a bit? That's because we want to add it last, after all your other sections have been created.
To create your Index, go into the desktop client (again, this feature does not work in the web interface) and open your bullet journal notebook.
Highlight all of the notes inside the notebook:

You'll see the collection of notes floating in your main window. Click on “Create Table of Contents”

Evernote will create a new note inside your notebook titled “Table of Contents.” It chooses the order of your notes based on whatever order they happen to be sorted in by default at the time you highlighted them. I wish there were a way to manually sort your notes inside a notebook, but unfortunately Evernote still does not support that feature (no matter which interface you use). But with some ingenuity, you can force it to change the default order. Working back to front, go into each of your notes and make a small change. Evernote will then sort your notes by modified date, meaning the last one you edit will appear on top.

Then rename your note to “Index.” If you want, you can also rearrange the list of links inside the Index, simply cut-and-paste and place them in the order you want them to appear.

And you're done!
Congratulations on your new digital bullet journal!!
Now, whenever you're on the go, you can easily add tasks, check off your habits, stay motivated, and even add to your lists easily using Evernote's mobile app. And with just a few minutes at the beginning of the month to copy any templates or change around a few dates here or there, the overall maintenance of this bullet journal is going to be super easy (and just think, you won't have to continue buying those paper journals, unless you're like me and still really want to use them, too).
What sorts of sections will you be placing into your new digital bullet journal?
Did you enjoy this article? Here are some more posts about time management and productivity you may enjoy:
- Why you need Tailwind in your Pinterest game
- Organizing Your Time as a Work At Home Mother
- How to Balance your Holiday To-do List when you Work from Home
- Finally!! Master your Social Media Content Calendar Once and for All
- 24 Great Gift Ideas for Work at Home Mothers
What is a Digital Bullet Journal?
A Digital Bullet Journal is the adaptation of a traditional bullet journal, one which a person can create using a paper journal with a legend, into an online environment such as Evernote.
Is there an APP for Bullet Journaling?
There are dozens of apps available you could use for journaling, though Evernote is probably one of the most versatile–allowing you to use it on desktop or mobile without paying an arm and a leg.
Why is it Called a Bullet Journal?
The bullet journal started out as short sentence fragments (or bullets, aka bulleted lists) which would allow you to shoot out your ideas quickly and categorize them for ease later using a legend.
Is Evernote Good for Journaling?
Evernote is my digital journal of choice precisely because it is so versatile, easy to use, and you can't beat the price (free).


Thanks for posting this.
You’re welcome! I’m so glad you found it helpful.
Thanks a lot for this!
It always felt weird for me to write personnal stuff on a notebook.
This is exactly the information I was looking for. Thank you for taking the time to write and post this!
Thank you so much!! Really! I was just looking for this! I wanted it on my iPad but I can’t install any apps because it is supervised by my school so I did it on web. 😀😇😍🥰
Hello! Just letting you know that I tried it, and you can add bigger tables in the web version. (I am on a Chromebook)
🙂
Oh that’s awesome! Thank you for stopping by and letting me know!
You’re welcome!
Hello, I have always struggled between paper and digital. I have used the Bujo system for years-but how do you make the digital and paper work together? I have carried a paper notebook with me since I can remember- not sure if I can let it go, LOL.,
Hi! For that, I would use a smart notebook, something like the Rocketbook, where you can write on a surface that feels like paper, then use your phone to scan the page and send it straight up to Evernote. After that, it’s really easy to keep track of things in Evernote and keep it with you, but you can also use a damp cloth to erase the page in the notebook so you can use it again when you need it for something else. This is the one I use (FYI, this is an affiliate link, I am an affiliate for Amazon. That means if you click on this link and make a purchase, I will receive a small commission for the referral. It doesn’t cost you extra, but I want to be transparent about the commission): https://amzn.to/3dHhygO